Understand what super-resolution microscopy can do for your research
When embarking on any new project, being prepared can make a big difference to the success of your experiment. This doesn’t mean that you need a masters in super-resolution microscopy, but just enough knowledge to understand the main concepts and techniques, their pitfalls and benefits, for you to make an informed decision on the best super-resolution imaging technique to use for your research.
Learn the basics: read & ask
It can be hard to know where to start learning on super-resolution microscopy, but there are a lot of resources available that can help you get started. We recommend starting with our previous blog post on ‘Why use Super-Resolution Microscopy: starting with the basics’ to familiarize yourself with key concepts of what super-resolution means, and the main techniques available for researchers to date. Recent literature reviews from experts in the field are referenced, which are worth reading 1-3. We also recommend browsing ONI’s website and visiting the technology pages to read introductions to different techniques and their potential applications. Finally, the portal iBiology offers short videos from key experts which can be very useful to learn or revisit microscopy basics.
Once you have a good foundation to understanding the technical basis, the best next place to go for specific applications of super-resolution in your specific field is the existing literature, so a search on PubMed would be the best next step. Have others used super-resolution techniques in your field? If so, what for? If not, can you draw parallels from close disciplines or biological questions using similar mechanisms?
SELF-TEST: After some initial reading, you should be able to answer the following 5 questions, for example:
- What are the main ways by which super-resolution techniques are able to beat the diffraction limit?
- What range of lateral resolution can you achieve with the different super-resolution techniques?
- Are you limited to fixed specimens or can you perform live super-resolution imaging? Which techniques are best suited for that?
- What is single-molecule localization microscopy? Name some examples
- How is super-resolution imaging different (and better) from electron microscopy?
Explore uses and applications of super-resolution imaging
If your background reading and literature search didn’t result in the outcomes that you expected or you want to better expand in understanding how super-resolution can actually be applied in practical examples, welcome to the club. It’s perfectly normal to need extra time to find the best experiment that can help you explore new dimensions and delve deeper into your research. While we can’t provide a comprehensive list of applications and biological questions, here are some examples of how our team and partners have used various super-resolution microscopy techniques within the Nanoimager to extract new crucial information and obtain exciting new data on a range of biological questions from the single-molecule perspective.
Super-resolution microscopy can allow you to:
- Resolve subcellular structures in the nanoscale to understand their shape
- Visualize and measure protein spatial distribution within subcellular structures
- Understand the interaction interface between two cell types, e.g. killer T cell and cancer cell
- Monitor single-cell receptor profiles to measure individual patient response to therapy
- Detect cancer markers or subtle changes in protein levels in clinical tissue samples with high sensitivity
- Characterize oligomeric protein states in physiological and pathological conditions
- Understand the heterogeneity of EV populations and characterize their intra and extracellular content
- Understand vesicle binding, uptake and internalization in target cells or tissues, as well as release from producer cells in response to stimuli
- Visualize and quantify infection through viral particle imaging at the single molecule level
- Perform single-particle tracking in bacteria or fungi to characterize the behavior of individual molecules, cellular structures or chromosomal markers
- Track and quantify single protein dynamics or receptor populations in live cells or subcellular compartments
- Follow viral particles throughout their life cycle
- Study & optimize drug or mRNA delivery, uptake, distribution, and release in cells or tissue
- Measure receptor internalization and endocytic transport
- Characterize antibodies for affinity and specificity
- Measure protein conformational changes
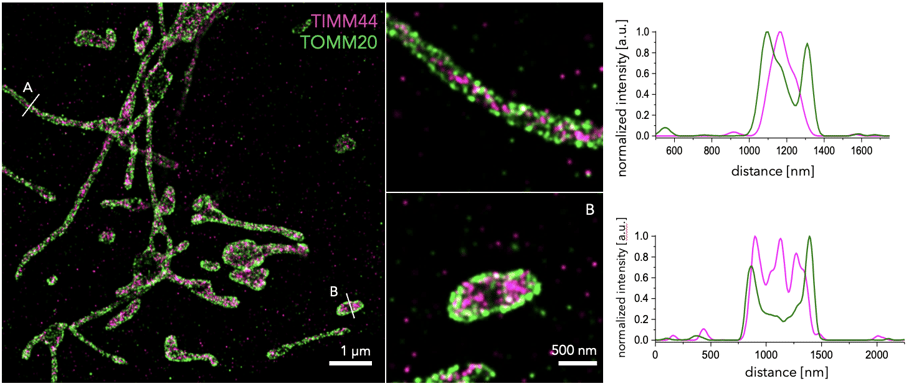
Figure 1. STORM image obtained with the Nanoimager, showing the inner mitochondrial membrane protein TIMM44 (magenta) and outer membrane protein TOMM20 (green) in U2OS cells, labeled with primary antibodies and secondary antibodies conjugated to CF583R and AF647, respectively. Insets show two examples of individual mitochondria. Line profiles from each mitochondria were obtained to assess protein distances. This highlights the power of single-molecule localization microscopy techniques, such as dSTORM to separate structures within tens of nanometer in distance and better understand subcellular organization!
What do I need to get started ?
Once you have a clear idea of the type of experiment that you would like to start with, make a list of everything that you’ll need for it. The sections below will help you navigate some of the key questions most ask themselves ahead of experimental planning.
Microscope (hardware) requirements
It is particularly important that you understand any specific requirements that your imaging system or microscope needs to have in order to capture the information desired depending on the chosen super-resolution techniques. This will include considerations such as: technologies supported, optical and temporal resolution, laser configuration, temperature control, objective compatibility, multicolor imaging, stage movement, or illumination modes, among others.
Microscope-wise, the Nanoimager is a great solution as it supports a range of super-resolution imaging techniques, both on live and fixed cells, including dSTORM, PALM, PAINT, smFRET, or SPT. It also enables you to perform up to 3 color imaging with lateral resolution of 20 nm and high sensitivity. To find out more about the flexibility and robustness of this benchtop microscope, visit our website and download the full product specifications.
It is also relevant to think about the imaging setting needed ahead of starting your experiment. This will depend on the super-resolution technique chosen, as much as the biological event that you are studying. Some of the key imaging settings you’ll need to think about are: how to know where to focus, what illumination angle to use (from epifluorescence to TIRF), imaging depth needed, laser power required, and frame number to capture key events. Other settings such as exact exposure time, should be optimized during image acquisition.
Sample requirements
Once you have a list of desired outcomes for your experiment and understand what your imaging platform can do, you can start thinking in the practical terms of how you can prepare your sample for your super-resolution experiments. Getting started can feel overwhelming, but hopefully your initial literature search has already shed some light on what you need to get started… and good news, it is not that different to what you need for any microscopy experiment! You may simply need to be more careful when choosing certain elements since super-resolution imaging techniques are a lot more sensitive by nature (part of their strength), which means that samples need to be cleaner, fluorophores as bright as possible and with special photophysics, and obtaining an optimal signal-to-noise ratio might be more challenging in certain scenarios. Here are the 5 main items that you’ll need for your experiment:
- Specimen
Your all important samples! Super-resolution microscopy can be performed on DNA/RNA, proteins, particles, cells and tissues. Depending on your sample, you’ll need to take different considerations, usually these encompass: sample purity, growth conditions, thickness (also depending on the imaging depth), and biomarker or cell density. - Sample holder
It is important to select a microscopy slide that:
- Has a glass imaging surface, plastic is less well suited for single-molecule localization microscopy especially
- Choose the correct glass thickness for a 100x objective, with the Nanoimager use #1.5H coverslips (170 μm)
- Coverslips need to be clean and sterile to minimize any debris that could increase background signal
- Coverslips must not be mounted or sealed to allow the addition of the imaging buffer prior to imaging
- We recommend using 8-well chambers (iBidi or Lab-Tek), 35 mm glass-bottomed petri dishes, or single coverslips, ideal dimensions 50-75 x 20-25 mm.
- To enhance cell adhesion, cell activation or block non-specific binding of reagents, it can be necessary to coat the coverslips before seeding the cells. Coating can be done with poly-L-Lysine, antibodies or other proteins depending on the experiment requirements
- Fluorescent probes or dyes
This is probably one of the most crucial parts of designing your super-resolution microscopy experiment. The choice of probe or dye to use will largely depend on the imaging technique being used, as they have different photophysical requirements. In general, key considerations in the selection of probes would entail considering: the size of the fluorescent protein, the oligomeric state of some probes, steric hindrance effects they could cause when binding to the target, probe or fluorophore brightness and excitation/emission spectrum, compatibility with other dyes for multicolor imaging, and how to label the target of interest (stable protein expression, transfection, immunofluorescent staining).We have put together lists of both organic dyes compatible with dSTORM imaging and photoswitchable fluorescent proteins that can be used for PALM, which you can find under the Resource page in our website’s Learning section. For Single Particle Tracking (SPT), you can visit our blog post of 4 key tips for labeling, imaging and tracking single molecules.
- Imaging buffer
This will also depend on the super-resolution imaging technique used and will be a crucial part of single-molecule localization imaging, for instance, which requires specific conditions, such as low-oxygen and reducing conditions which promote maximal fluorophore blinking and anti-bleaching activity to contribute to high-quality super-resolution images. - Protocol & other solutions
Based on your initial literature review, you should hopefully have some protocol examples at hand to use. One of the main guiding factors to choose this, should be the probe or fluorescent dye used for imaging. For immunofluorescence-based assays, key steps will include: fixation, optional quenching and/or permeabilization, blocking, antibody labeling, and washing in between. For live imaging, this would be a lot more simple and the sample labeling and imaging setting would take center stage.
Data analysis (software) requirements
Thinking about how you can extract key quantitative outputs from your data beyond obtaining a pretty image will be very important when choosing a data analysis software to process your images. While there are many open-source software options available, such as FIJI, new users often find the user experience more seamless when using the software provided by the microscope manufacturer. In some instances, such softwares also offers additional flexibility with output data that can be exported to third-party software or that can accommodate self-built Python scripts. This is the case for the Nanoimager software (NimOS), which controls image acquisition and also provides real time data analysis tools to examine data during your imaging session.
For advanced data analysis, ONI’s collaborative discovery platform (CODI) offers a few different Apps and tools that can help you clean up your data to improve signal-to-noise as well as understand the morphology of a structure of interest, how molecules cluster, or identify EV subpopulations based on size or biomarker content. One of the key tools used are clustering algorithms, which are crucial to process single-molecule localization data, such as dSTORM, PALM or PAINT point cloud data. To learn more about clustering, read the following post Beginners guide to clustering on localization data and watch the recording of a webinar on the same topic by ONI’s Data Scientist Haraman Johal.
Some of the key outputs that you can obtain from CODI include:
- Real-time data visualization, including histograms of various cluster metadata
- Clustering .csv file containing quantitative and morphological information about each cluster
- Summary report segmenting clusters into user-defined phenotypes
- High-resolution images of single-molecule localizations and their assigned clusters
Figure 2. ONI offers a complete benchtop solution to help you throughout your super-resolution journey: from sample preparation with reagent kits, to image acquistion on the Nanoimager and data analysis on CODI.
How to iterate and optimize super-resolution imaging
Start steady, then go big
Hopefully you now feel empowered to start your super-resolution journey and feel extremely excited to start testing new hypotheses and experiments. However, it is important to start with some smaller, consolidating experiments, particularly if you are new to a technique. Something crucial is to think about any appropriate controls you may need, positive or negative controls for both your imaging conditions and target. Here’s a recent blog post from ONI’s Field Applications Scientist Dr Laura Woythe, which can be very helpful in designing your experiment including essential imaging controls.
Don’t be afraid to experiment and ask for help
Once you’ve conquered your first experiment, there are still many doubts that can arise regarding the image quality and whether the data obtained is valid or meaningful. Ideally, you want to start imaging a known structure or protein so that you can confirm that the localization pattern or molecular behavior observed matches what is expected. However, that might be difficult for new experiments or hypotheses being tested. In this case, it is important to seek help from someone more experienced who can help make sense of the results, or reach out to our team of experts if you are a user in need of support.
We have many articles and resources both on our website and blog, which can hopefully be a first stop point for you to assess how best to optimize your sample preparation, image acquisition and analysis, such as this blog post from ONI’s Dr Stefan Balint on the Dos and Don'ts of dSTORM imaging.
Last but not least, ONI is now also offering a new range of products to help you get started in your super-resolution microscopy journey, starting with our brand new dSTORM Training kit, which provides all the necessary reagents and training materials to understand the basics of single-molecule localization microscopy and get started with dSTORM imaging - from simply preparing a nuclear pore sample to obtaining beautiful and quantitative data images.

Do you need help getting started with super-resolution imaging?
We are here to help! You can browse our website for technical articles, learning resources, and publications that have used our technology on different biological applications.
ONI is on a mission to change this by making super-resolution microscopy more accessible and easy to use. We want to help researchers worldwide access the powerful technology that can allow them to see and understand the world surrounding us with the greatest possible level of detail. Join us in exploring the nanoscale world and pushing scientific boundaries with cutting-edge technology! For any queries and sales support, contact our team at hi@team.oni.
References
- Schermelleh, L., Ferrand, A., Huser, T. et al. Super-resolution microscopy demystified. Nat Cell Biol. 2019; 21: 72–84. https://doi.org/10.1038/s41556-018-0251-8.
- Prakash K, Diederich B, Heintzmann R and Schermelleh L. Super-resolution microscopy: a brief history and new avenues. Phil Trans R Soc A. 2022 Feb; 380: 2220. https://doi.org/10.1098/rsta.2021.0110.
- Valli J, Garcia-Burgos A, Rooney LM, de Melo e Oliveira BV, Duncan RR, Rickman C. Seeing beyond the limit: A guide to choosing the right super-resolution microscopy technique. J Biol Chem. 2021; 297 (1): 100791. https://doi.org/10.1016/j.jbc.2021.100791.