We have all been there, after spending a day or two fixing and staining samples, the images don't look as good as expected, the signal is not optimal, and no obvious conclusion can be drawn from the data. We have put together some tips to help you optimize your immunofluorescence staining protocol and increase the signal-to-noise ratio in your samples. If you are unsure about how the technique works, we recommend you read our immunofluorescence guide first.
Tip #1. Plan well before you start and follow a checklist
This may seem obvious but taking the time to go through a basic checklist can make a big difference! Timings are key in most steps of an immunofluorescence staining protocol, so avoid unexpected interruptions and minimize the chances of forgetting about a reagent or finding out that your lab mates have taken the last aliquot when you need it. Here is an example:
- Read well any protocols that you have been given (ask if necessary!), check the literature for similar protocols on your sample of choice,and read the manufacturers’ instructions, especially for antibodies.
- Prepare all solutions fresh and calculate the total amount that you’ll need depending on the number of samples (don’t forget about your controls, see tip #2). If using common stocks, make an aliquot for your experiment to make sure that you will not run out of reagent(s).
- Consider sample preparation (e.g. cell confluency can affect staining efficiency) and special coating of the coverslip, which can help with cell adherence.
- Select the best fluorophore/dye for your imaging (i.e. if it's for dSTORM microscopy, does it blink?)
- Check that you have the right antibodies, either for direct or indirect immunofluorescence (see schematic below). If using several antibodies at once, write down the different combinations and select the optimal color/fluorophore and species combination, depending on the laser lines and filters in your microscope system (think about their spectral overlap) and your proteins/antibodies of interest. Be mindful of species compatibility when using different antibodies simultaneously.
- Think about additional markers, for instance, to visualize certain cellular structures to have points of reference in your image or to compare with a robust staining that you know works well.
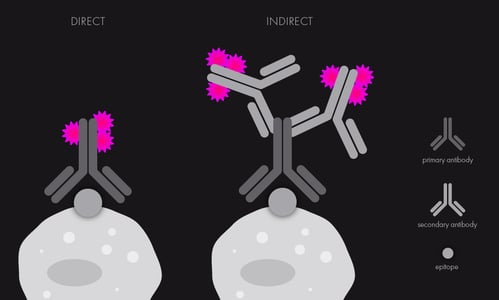
Schematic of direct (labeled antibodies) vs indirect (two antibodies, secondary antibody is the one labeled) immunofluorescence.
Tip #2. Don't forget to include controls
This is an extension of proper planning, but we made a separate point because it is very important. Particularly, when optimizing a protocol and trying different conditions or testing an antibody for the first time. Affinity-purified antibodies normally work well but can also have cross-reactivity. Some researchers like running controls for their antibodies to assess the background signal of non-specific binding.
Controls to consider including would be:
⇒ One for each variation in the protocol (different fixation methods or antibody dilutions).
⇒ Antibody non-specific binding controls: for instance, one sample stained with primary antibody but no secondary/no fluorophore, and one sample with no primary antibody but secondary/fluorophore only.
⇒ When working with antiserum, use the pre-immune serum as a control.
Tip #3. Try different fixation methods
When fixing cells, tissues or strains, we arrest them at a given stage/time by essentially immobilizing the sample. This can be quite harsh and affect cellular structures. It is worth spending the time to try different fixation methods and compare the effects on your sample and cellular structure of interest. The main fixatives used are:
Paraformaldehyde (PFA): conserves cellular morphology as it is a chemical cross-linker. It can affect antibody access to some antigens and should be used at low concentrations (1% better than 4%, if possible) for 10-20 mins at room temperature. PFA can also denature proteins, affect fluorescence signal and increase background levels. A washing step after fixation with PFA using glycine is sometimes used to quench the PFA and terminate the cross-linking reaction.
*An additional permeabilization step using detergents (i.e. Triton, NP-40, Tween, saponin…) for cells, and for bacteria organic solvents or detergents with or without lysozyme, is indispensable to allow the access of the antibodies into the sample. Note that gentler permeabilizers (like saponin) may need to be used in every step throughout the staining (antibody incubation, washes) to avoid reversibility.
Methanol: conserves cellular structures but can damage several epitopes, as it dehydrates the sample (not recommended for state-specific antibodies, like phospho-antibodies). It also compromises lipid integrity, so avoid using when looking at membrane-associated antigens. Using methanol, also saves times, as it permeabilizes cells at the same time. It is always used at cold temperatures.
Acetone: more gentle with epitopes but also causes removal of lipid components. Similarly to when using methanol, a single step also serves for the permeabilization of cells.
Glutaraldehyde: less used than the previous ones, as chemical cross-linking is even stronger than PFA, which can modify cell or tissue architecture. It is sometimes used in combination with PFA as a mixture for fixing samples.
Tip #4. Optimize your buffers and the use of blocking agents
Most antibodies will work well in common buffers, such as PBS. Some antigens and antibodies might, however, benefit from slight changes in buffer ion composition, like calcium, potassium or magnesium. Remember to filter any solutions and buffers and make sure that there are no precipitates when kept over time, which could interfere with your staining or cause image artefacts.
To reduce non-specific antibody binding and, in consequence, reduce background signal, it is recommended to use a blocking solution prior to incubation with antibodies. The most effective blocking solution will be that containing serum from the same species in which the secondary antibody was raised. In many cases, bovine serum albumin (BSA) at a 5% dilution will work as a general protein blocker that can be used with any secondary antibody. Blocking can be maintaining throughout the staining protocol and added to all solutions, including antibody dilutions.
Tip #5. Try different antibody incubation times and dilutions
Sometimes less is more – extending antibody incubation for several hours, will not always be the best solution. It will depend on how specific the binding to the antigen is. If you elongate primary antibody incubation (don’t go over 2 hours at room temperature), make sure to wash your sample thoroughly to remove any non-specific binding. Alternatively, an overnight incubation at 4°C, and in the dark, can be recommended for primary antibodies.
When using an antibody for the first time, we advise to titer it by using a dilution series. For instance, prepare four coverslips with four different dilutions and spend 5 minutes checking each of them. It won’t take long and it can be highly informative.
Tip #6. Wash properly!
Don’t underestimate the importance of being thorough with washes during your immunofluorescence staining protocol. It’s easy to shorten these when in a rush, which can create higher background signal. Particularly, when preparing samples for super-resolution imaging where every single fluorophore is detected, such as in STORM imaging, this must be considered.

For optimal immunolabeling results, is best to work as cleanly as possible, follow the protocol steps, handle the sample with care and protect it from light throughout the staining and imaging process.
Tip #7. Be mindful of the coverslip
It is sometimes easy to forget that the coverslip is an integral part of the sample that we will be imaging. Any dust or dirt particles will be picked up as fluorescence signal during imaging and will likely generate artefacts. Additionally, make sure to choose the right thickness for your type of imaging – check what thickness is recommended by the objective (or microscope) manufacturer, as this may affect the quality and resolution of acquired images.
Tip #8. Select the proper mounting media
Mounting media helps maintain the sample by preventing dehydration and can improve the refractive index for microscopy. When mounting the sample, add the right amount – too little can cause air bubbles to be trapped under the coverslip (air bubbles are not welcome when imaging!) and too much will overflow. It is sometimes recommended to seal the samples with nail polish to prevent drying and movements of the coverslip while imaging, apart from dSTORM experiments. When performing dSTORM, the addition of special buffers that ensure dye blinking is an essential step (read our dSTORM buffers blog post for more details). This is done after mounting the sample and right before imaging. Because dSTORM buffers are non-physiological and lose activity over time, buffers need to be washed off and replaced after a short period of time (if the sample is left unsealed), which also allows for samples to be re-used.
There are different anti-fade mounting media that include agents to protect bound fluorophores from photobleaching during storage, handling or when exposed to the imaging excitation light. Using the right media can be as crucial as choosing the right fixation method. To name a couple of commercial options (home-made ones are also a good solution): Vectashield, a glycerol-based medium, is one of the most widely used ones. It can, however, be unsuitable for imaging modes that rely on the red end of the spectrum, as it can generate autofluorescence or be less good at anti-fading. On the other hand, Prolong gold seems very popular and versatile with different fluorescence labels. This is a polyvinyl alcohol-based media that requires overnight hardening to become gel-like. It can have DAPI nuclear stain included. The flattening process can affect 3D imaging, so comparing different media is recommended.
Importantly, if the mounting media has a refractive index close to the refractive index of the glass, the autofocus in some systems might not work and it won’t be possible to perform TIRF (Total Internal Reflection Fluorescence), as an index mismatch is crucial to obtain reflection. Using TIRF imaging can significantly improve the signal-to-noise ratio, especially when looking at molecules close to the surface or on membranes.
Tip #9. Be patient, careful and repeat if necessary
Luckily for you, we finish our list of tips with an obvious one. It may sound simple, but it is important to remember: the more time and patience you dedicate into optimizing the immunofluorescence protocol for your sample, the better-quality results you will obtain. Work as cleanly as possible, follow the steps (no shortcuts), handle the sample with care (avoiding drying the sample, unless specified as step in the protocol) and protect it from light throughout the staining and imaging process. Finally, like for any experiment, be patient, run the appropriate controls and don’t be discouraged (even if repeating is necessary). Once it works, you can get nice images like this one!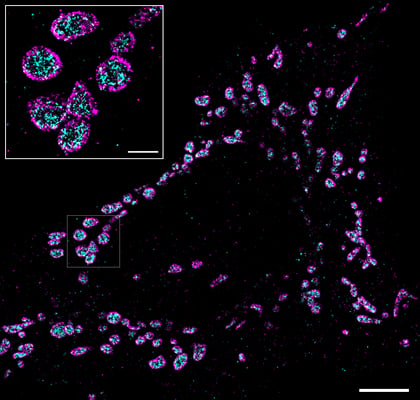
Two-color immunofluorescence image of human keratynocytes stained with an anti-TOM20 (mitochondria, in magenta) and anti-HSP60 (membrane, magenta) imaged with the Nanoimager using dSTORM. Scale bar is 5µm (inset from boxed area, scale is 1µm).
If you are thinking of getting started with super-resolution microscopy techniques like dSTORM or PALM, our team of scientists at ONI are here to help, please get in touch. Happy imaging!